Wednesday, April 17, 2013

Happy Earth Day! Check out these Earth Day Tips that will make a BIG Impact!

With Earth Day being next week (Monday, April 22nd), and the urge to spring clean being in the air, this week’s blog is devoted to how we can make a difference and all “go green”.  Here are a few ideas that are easy yet will have a big impact on the wellbeing and future on this wonderful planet we call home. 

1.       Add a recycling bin inside your house. 
·         At my house, we have a dual trash bin: one for recyclables, one for trash.  Since these are side-by-side, it eliminates any excuse or laziness that would lead you to just throw away that plastic yogurt cup instead of recycling it.  If you cannot do the side-by-side route, keep your recycling bin close and easy to get to (even if it means using a small basket or bag that you then take out to your recycling bin every night).
·         Almost all areas have curb-side recycling available.  If you are not set up for it yet, check your city’s website or your local waste removal company.
·         If curb-side is not an option, find your nearest recycling center that you can make trips to.  Added bonus: often times these centers recycle more than the curb-side option does.
2.       Stop using bottled water.
·          If you want “cleaner” water, filter your own.  There are many handy gadgets to do this (entire home filter, attachment for your faucet, jug to put into the fridge, water bottle with filter…to name a few)
·         Use a re-usable water bottle.  These are found everywhere now and in all materials.  I’ve seen numerous plastic in all sizes and colors, metal, and even glass.  Find what works for you and carry it with you always.  Note:  added bonus, you will end up drinking more water which is good for your body and health!
3.       Buy eco-products.
·         I think almost all stores (Target, hardware, grocery, etc.) carry eco-friendly varieties of the same products you are currently using.  These include ingredients that are biodegradable, recycled, free of chemicals and dyes, etc.  The less we use of all of the former is better for our environment, our home, and our own health.  If you aren’t ready for a full out overhaul, consider switching over 1-2 products whenever it’s time to stock back up.
4.       Use energy-efficient light bulbs.
·         Not only will this be good for the Earth, but it will be good on your pocket-book too!
5.       Get a programmable thermostat.
·          Again, this is good for both the Earth and your pocket book
·         With the beautiful Spring weather, start opening the windows to cool/heat the house
·         In the summer time, open the windows at night and use an attic fan when possible
6.       Watch your water usage.
·         Turn off the water between dishes or while you are scrubbing your hands with soap.
·         Water your lawn deeply but infrequently.  This means run a cycle (maybe half the time as you normally would), wait an hour, then run another cycle.  Added bonus: grass roots will grow deeper, pulling more water from the earth below and requiring less water overall.
7.       Use native plants.
·         Spring is the season for planting…native plants are often more hardy, drought resistant (roots grow deeper and plants are better accustomed to the local environmental conditions), and easier to manage.  This will save you time, water, and money.
·         Check with your local nursery, arboretum, or online resource to find the best native plants for you.
·         In our area, a few to try are: BlueStar, Blue False Indigo, Willowleaf Sunflower, Smooth Hydrangea, Spicebush, Cardinal Flower, Ninebark, Fringe Tree, Christmas Fern, Wild Hyacinth, and the Pawpaw tree.
8.       Compost and use natural products on your lawn.
·         Easy to do and great for bigger, healthier, happier plants (plus, less waste in landfills!)
·         By using natural products (such as Natural Guard), you will be preventing gallons of chemicals from polluting our water ways.
9.       Know where to recycle your hazardous materials.
·         Here in Kansas City, go to:  www.recyclespot.org.  You can also call or go online to make an appointment to drop off your hazardous materials year round at www.jced.jocogov.org or call 913-715-6900.
·         In you live outside of KC, check with your local city or county website
10.   Donate or trade in your clothes and household items.
·          Goodwill, charities, and churches are always good options for where to take your gently used items.  Not only does this keep waste out of our landfills but it helps those in need.
·         Here is KC, Habitat for Humanity offers an excellent program called ReStore where you can shop or donate.  Go to: www.ReStoreKC.org for more information.
·         Places like Best Buy will refurbish or properly dispose of old electronics
11.   Mow and fill up your gas tank in the evening.
·         Since more ozone forms air pollution (VOCs and NOx) when it’s hot and sunny out, doing these chores in the once the day cools down helps reduce the pollution created.
·         Scary Fact: Using your lawn mower (3.5 horsepower) for 1 hour can create as much air pollution as a new car driving 340 miles! (from MARC Environmental Programs)
12.    Plant a tree (or help sponsor one being planted)!
·         Check out: www.TreesForMyCity.com to see how you can double your donation
13.   Eat Local.
·         By eating locally not only are you supporting your neighbors, state, and country, you are also greatly reducing all of the pollution created by transporting your food to here.  Added bonus:  food will be picked when it is ripe, giving it a more delicious flavor!
·         Enjoy your local Farmer’s market!
·         Check out www.kcfoodcircle.org
·         Take advantage of the Community Supported Agriculture (CSA) Programs!  These provide you will local produce (and sometimes meats as well) each week.  To find farms that participate all around the country, go to: http://www.localharvest.org/csa/

There are obviously many more tips and ideas for how each of us can “go green” and support this great planet we live on.  Even just making a few changes can have a big impact!  So dive in and help create a better future for all of us and generations to come!

 Happy Earth Day!

Wednesday, April 10, 2013

Work Your Arms and Legs with - Rising Elbow Power!

My husband and I were driving in the car recently and we had one of our classic life-changing, life-planning conversations; something we do at least twice a year.  In these we end up talking about how all aspects of our lives are going, discuss things we’d like to make adjustments in, and then plan out the future, both immediate and more long term; this last conversation resulted in a three to five year game plan.

As I said last week, Spring is a time of growth and renewal; let it be the same thing for your life.  What do you want this next year to be?   What changes do you want/need to make?  Sit outside, soak up the feeling of Spring and feel out what you really want; then make a game plan and begin making the adjustments.  Maybe it’s as simple as re-evaluating what you came up with for the New Year…maybe it’s something entirely new (big or small); either way, tap into it and let the new beginnings and opportunities that come with Spring inspire you and carry you to your new goal.
This week we are working our legs and arms with Rising Elbows.  In the martial arts, elbows are used for “in-tight fighting” (defending).  They are very strong and powerful as long as you use your entire body to strike; think of this exercise as a chance to hone in our your entire-body power!

Rising Elbow Power
Begin with your feet wide in a comfortable squat position (that means knees are bent and muscles are working but you don’t have to be all the way down).  In martial arts this is our “horse stance”.  Remember, the lower you are able to squat down, the farther apart your feet need to be.  Rule of thumb: you always need to have your knees over your feet and be able to see your toes when you glace down (knees pressing out and bootie back); this will protect your knees so that you can do many more squats and movements for years to come.  In addition, go as low as you can go while keeping your back upright.
Pull your hangs up to your armpits with your elbows back (“elbow position”), keeping your chest open and your head up.  Now it’s time for the rising elbows.  Drop into a low squat position as your drop your right elbow down in front of your belly.  From here, explode out of your squat, simultaneously rising up in your stance and forcefully pushing your elbow up until it is in front of your nose.  As you do this, exhale (audibly) from your belly; this will activate your core muscles, giving you a better workout and more power.  Repeat on your left side. 
Go fast and strong for 1 minute; repeat for 2-3 more rounds.

Wednesday, April 3, 2013

Core Strength with Centered Push-Ups

Happy April!  I hope you all had a wonderful holiday week with friends and family, enjoying the beautiful weather!  My family and I actually spent the weekend home and healthy, something that hasn’t happened in over a month; it was wonderful!  I think each day we went for at least 3 walks outside, listening to all the birds chirping, looking at the buds and leaves coming out on all the trees, and enjoying the time together.  As I’m sure all of you can tell by now, I love Spring.  It is such a beautiful and wonderful time of growth and renewal…it always fills me with a sense of joy, new beginnings, and opportunity.

This week we are going to focus on our core muscles with a simple, modified Push-Up (“Plank”) position. The exercise is really quite simple in it’s movement, and yet it will work your entire body.  This is a toning exercise, not a cardio exercise, so make sure you add in some fast paced movements from prior weeks as well.

Centered Push-Up
NOTE:  You will want to use a weighted ball or balance ball for this exercise

Begin on the ground with your hands resting on the ball.  Bring your shoulders over your hands keeping your elbows bent slightly, chest open, and head up.  Pull your belly in toward your spine to support your lower back and step back into a push-up position (you can also do this on your knees).  Tuck your glutes under, strengthen your thighs, and extend through your heels; this will keep all of the muscles in your body activated.  Being on the ball instead of on the ground will really challenge your core, stabilizing muscles; make sure you keep centering into your belly and pulling your core in.  NOTE: If you are on your toes and your lower back begins to hurt (or if it starts to dip down toward the ground), you need to drop down to your knees!  Hold for 1 minute and then do a cardiovascular exercise; repeat for 2-3 more rounds.

Want an extra arm challenge?  Maintain the same position as above but alternate between adding in push-ups on the ball and simply bending your arms and holding.

Friday, March 29, 2013

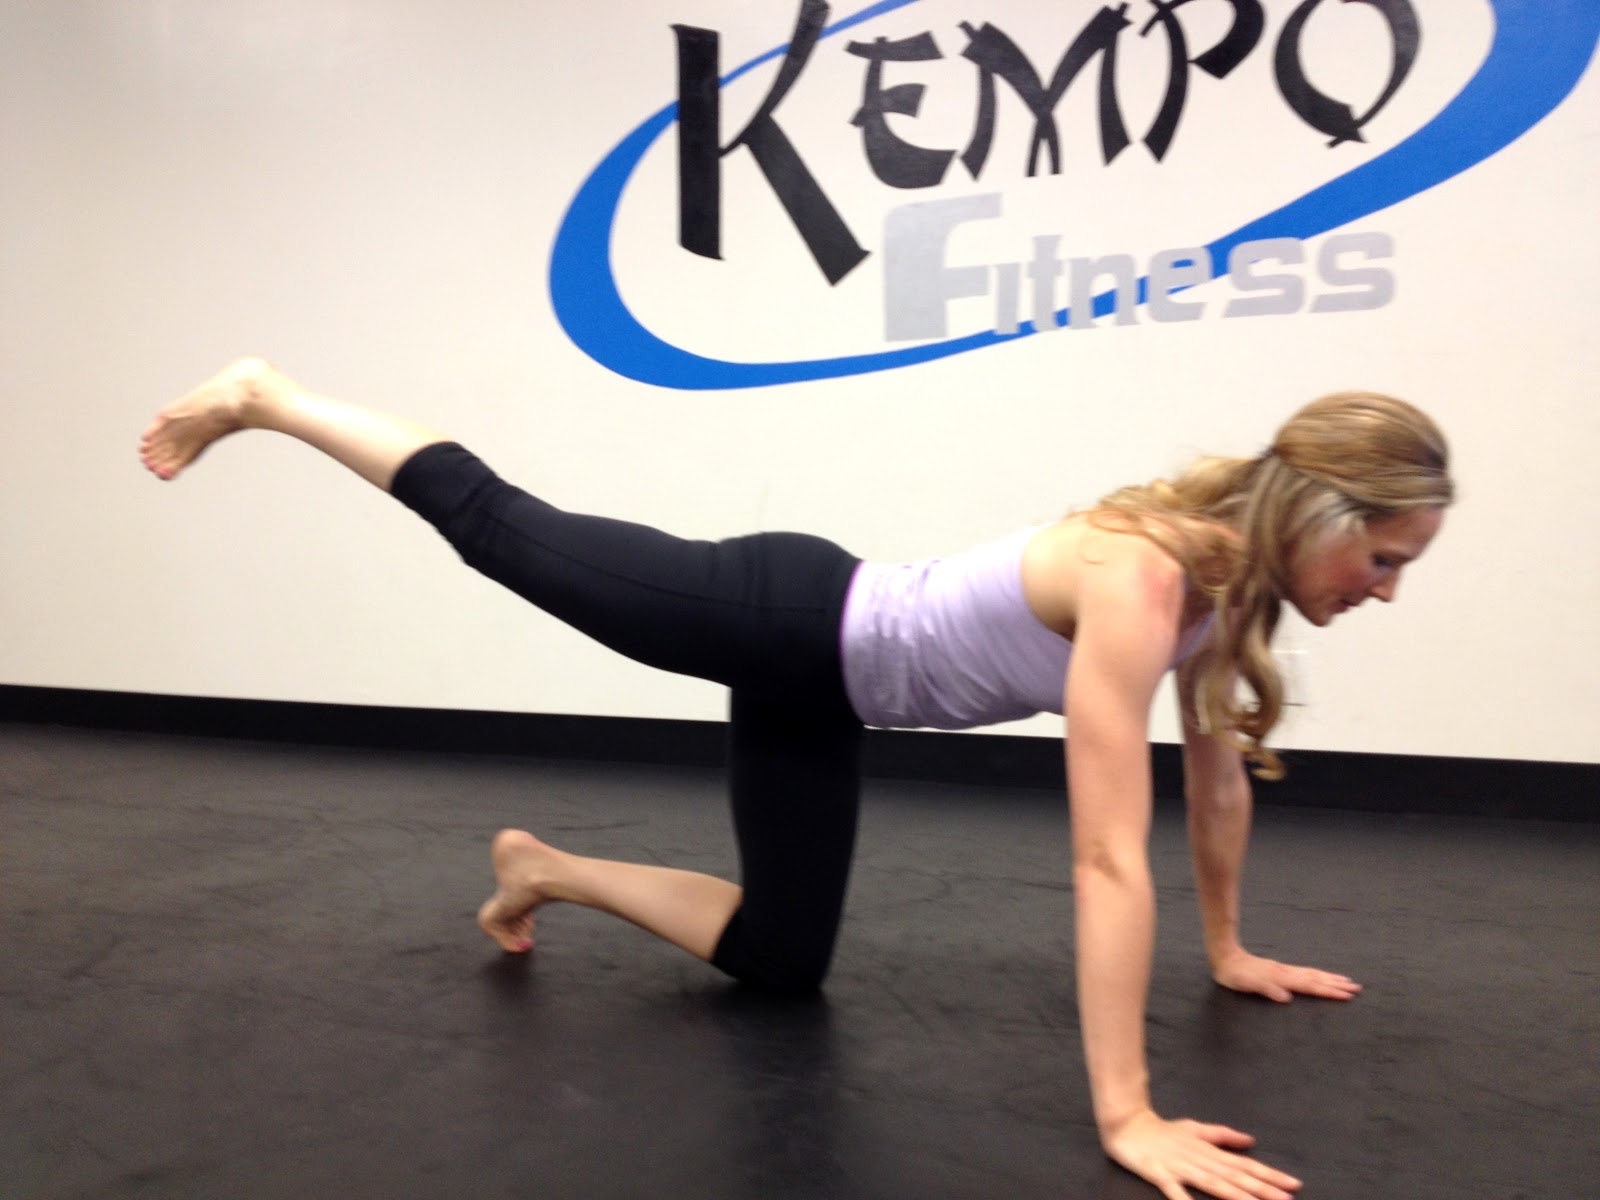
Perky Derrieres for Springtime! - Back-Kick Combo

It’s Springtime!  It finally feels like Springtime!  I don’t know about you but I just want to go sit, play, and relax outside, all day long.  The birds are chirping, the sun is shining, and it’s warm but not hot….absolutely perfect.  Today was the first day of the year that I wanted to take care of my rose bushes and plant happy flowers in all the pots for the front step.  I think having pretty flowers in the front really help to put a cheery note on the day when you leave the house and then they welcome you back home, inviting you to relax and re-center.  Since this is typically a week for family gatherings, I encourage all of you to go for a stroll outside or simply just sit and enjoy the beautiful Spring weather.

For our exercise this week we are going to be focusing on our back-sides…our derrières that is!  Always a good this to do when shorts and swimsuits are looming in the near future.  So kick on and enjoy the rewards of perkier cheeks!

Back-Kick Combo 
This week we are working a back kick from the ground two ways: slow for endurance and fast for cardio.
Begin on all four with your hands under your shoulders and your knees under your hips.  Pull your belly in to support your lower back (feel as though your lower back is flat and long), open your chest and lift your head up.  Make sure to maintain this throughout the exercise!  It will protect your lower back! 
1.       Keeping your hips flat to the ground, bring your right knee up into your chest as high as you can; hold for 2-3 seconds.  Now, extend your right leg behind you by pressing back with your heel (you want to press straight back, not swing the leg down and back up).  Lift your leg as high as you can while still keeping your belly pulled in and your lower back flat; hold for 5 seconds.  You should feel your hamstring and glute really activate.  Repeat for 5 reps.

2.       Now it’s time to go fast!  Repeat the same movement as above but with no pauses or holds; go as fast as you can!  Remember to keep your belly in, back flat, and press through the heel.  Repeat for 25-35 reps.
Once you are done with 2., switch to your left leg kicking and repeat.  Once you are finished, go for 1-3 more rounds on each side.


I hope you all have a wonderful week enjoying the beautiful Spring weather!


Wednesday, March 20, 2013

1, 2, 3, POWER! - Get Ready For Toned and Fabulous Arms!

Congratulations!  It’s now officially Spring!  Even though it sure doesn’t feel like it this week, Spring weather is coming soon; that means we’ll all be flashing our guns in no time…our super toned and fabulous arms that is.  However, if your arms aren’t quite as impressive as you’d like them to be, or you just want to make sure they stay looking great, then read on and enjoy this week’s arm blaster.

This week we are going to rock the arms with a triple jab/cross combo.  This exercise is fast-paced and endurance driven so get ready to work those arms and feel the burn!

1, 2, 3, POWER!
NOTE: Although I love the practical self defense application of practicing from an “on guard” position with your hands up to protect your face (this is what I am demonstrating in the photo with a “front two knuckle punch”), I have found that my cardio kickboxing students have better form and are able to work the full range of the movement easier if they just keep returning their hands to their armpits.  I also recommend doing a “thrust punch” which will keep the pinkie side of your hand down towards the ground the entire time; this will keep your elbows down throughout the punch (very important).  Again, to do the punch correctly, and get the most out of it, start from the armpits, keep your elbow down and in tight to your body the entire time, and extend your punch all the way (just shy of locking your elbow).  Once you have this, the rest is easy!

Start with your feet staggered (think of standing on the corners of a box) with your hands pulled up by your armpits.  If your right foot is in front, you are going to punch 3 times with your right hand (a “jab”) followed by 1 punch with your left hand (a “cross”).  This rear hand should have more power since you are able to use the torque and strength of your legs and hips in the strike.  As you are punching, think: fast, fast, fast, POWER…fast, fast, fast, POWER (no breaks allowed; keep the tempo up).  To help you keep your speed up, I recommend listening to some upbeat music with a fast, strong bass (in class we listen to Pandora’s “Dance Cardio Radio”).   

Go for 1 minute with your right as the 1, 2, 3 (and your right foot in front) and then 1 minute with your left as the 1, 2, 3 (with your left foot in front).  Remember to extend your punch all the way and then keep that arm coming back all the way to your armpit…this will get harder to do the farther into the 1 minute round you get.  But remember, if you want to sleeveless shirts with pride, keep going!

Enjoy!

Wednesday, March 13, 2013

The Sprinkler Move for your Core

Welcome to daylight saving time!  Isn’t it nice to have some more hours of daylight in the evening?  Daylight saving time means more time for the kids (and us) to go play outside, enjoy the outdoors, grill, and dream of all those warmer spring days ahead.  If you haven’t yet, take some time this week to go outdoors and enjoy the calming and rejuvenating nature of…nature!

This week we are working on our core muscles.  With more daylight hours and warmer weather comes more time gardening and working on the lawn.  This exercise will help you strengthen your side abdominal muscles, helping to keep you fit and feeling great during your twisting, turning, outdoor chores.

The Sprinkler
Sit with your legs fully extended, feet flexed.  Make sure you activate your leg muscles, feeling as though they are pressing together and lengthening out through your heels.  Pull your belly in toward your spine, lift out of your lower back, and open your chest.  Lift your arms up to shoulder level (yes, shoulder level, not below) and extend your arms in each direction; this will activate all of your arm muscles.  This is your foundation; maintain this position throughout the exercise (it will make sure you workout your entire body, focus on your core, and protect your lower back).  Now, lean back slightly and twist to the left while inhaling; return to center with your exhale (moving slowly).  Repeat on the other side.  Alternate sides for 15-20 sets (1 on each side = 1 set).

Variation
Do The Sprinkler as above but this time vary the tempo.  Try:
1.       Inhale to the left, exhale to the right (moderate tempo).  Repeat for 20-25 sets.
2.       Complete 1 full set (left and right) on each inhale and exhale (fast tempo).  Repeat for 25-30 sets.

Tuesday, March 5, 2013

Great Leg and Hip Workout -- Double-Bam Kick

Wow.  I feel like it has been ages since I was able to write my last blog; I apologize for the lapse!  These last two weeks have been a blur of snow, travel, and a lot of sickness.  As I often tell others: life is crazy!  You just have to make sure you keep moving forward.  That said, let’s jump right in to our exercise of the week!

This week we are going to focus on our quadriceps and hip flexors with the:

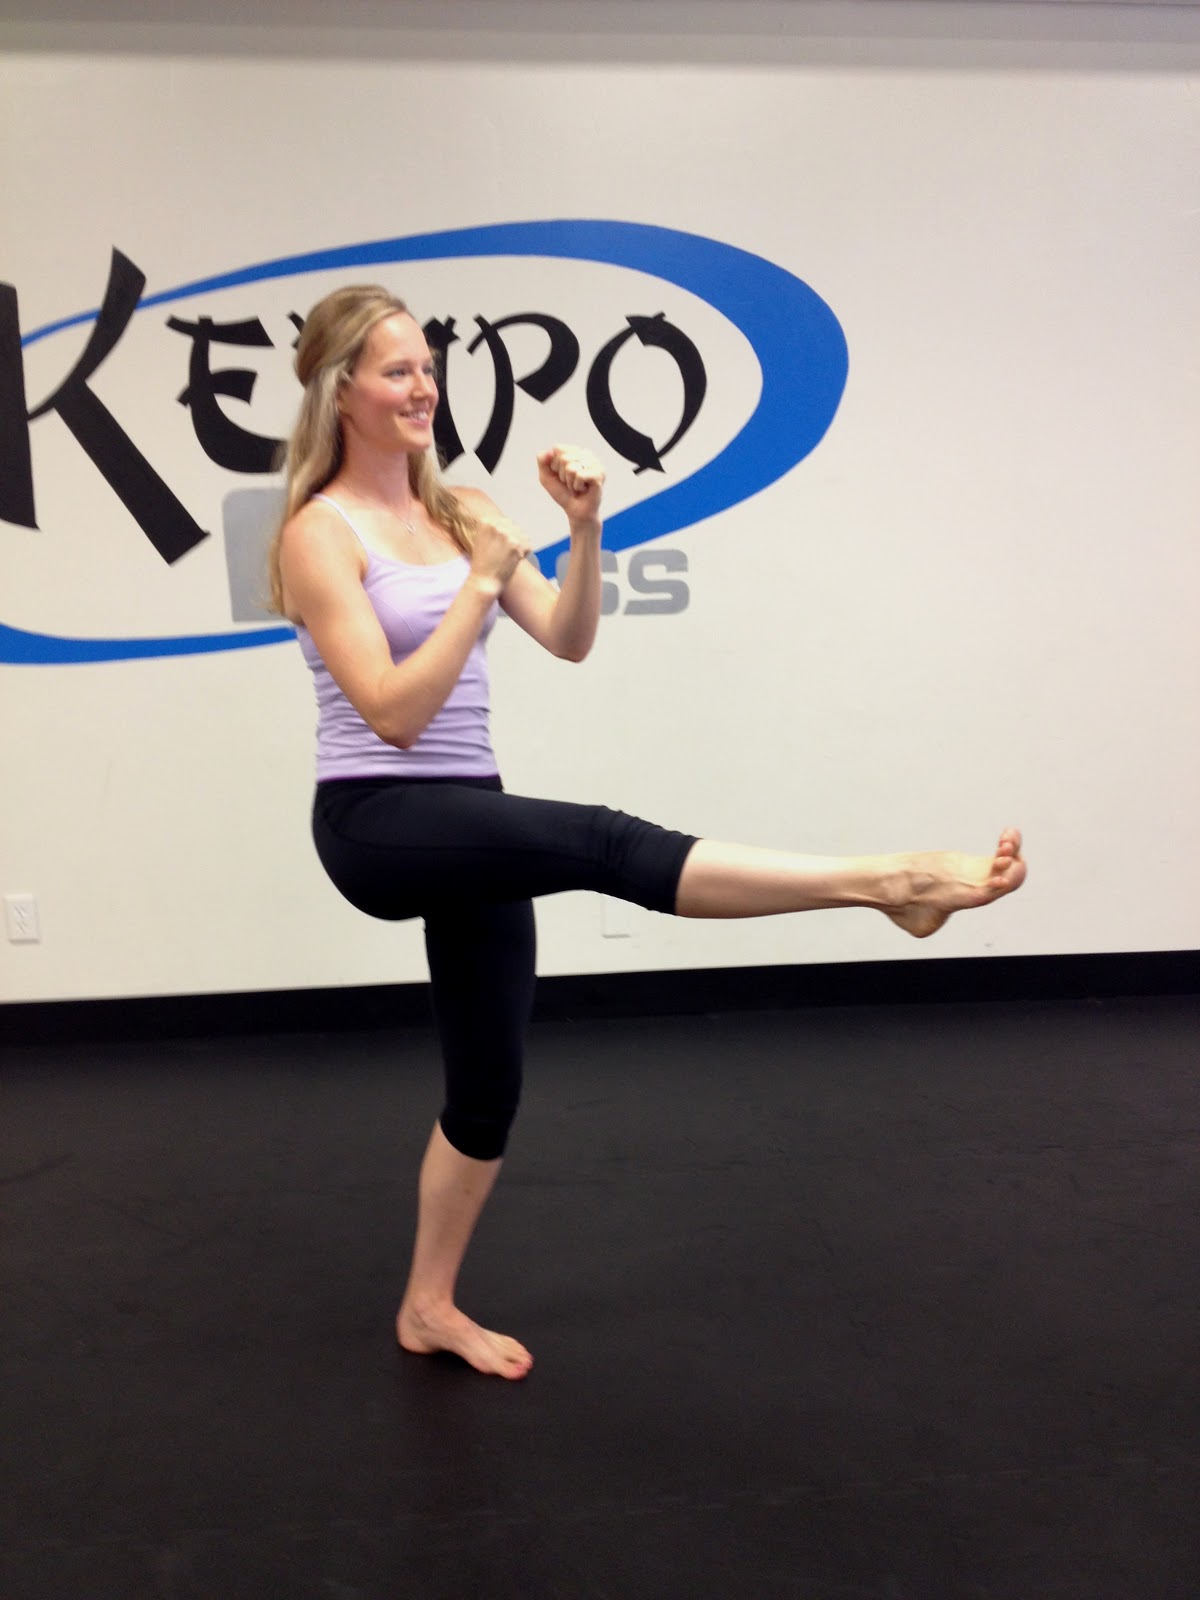
Double-Bam Kick

Begin with your feet separated, left foot in front; think of your feet being on the corners of a box.  In Kempo we call this a “half-moon stance”.  Bring your hands up “on guard” (knuckles in front of your chin), pull your belly in toward your spine, and lift your chest up.  Maintain this position throughout the exercise. 

Now it’s time for the “Double-Bam Kick”.  Bring your right knee up in front of your belly button while keeping your right foot pulled in tight by the left knee.  Think of this as your starting point for the kick.  For the kick you are going to do a double flick with the right foot; with each flick, extend the leg as high as you can and then return to the starting point position.  The goal is to keep your knee high and steady while you kick as quickly as you can.  Finally, you can step back down to the ground with your right foot.  Continue kicking with the right foot for 1 minute, then repeat with the left foot.  Feeling daring?  Go for 2-3 more rounds on each leg.
If you don’t feel like you are working your legs enough (ha), bend your standing leg more, lift your knee higher, and make sure you are doing the full extension and re-chambering of your kicking leg.  In addition, try to keep your upper body and hips totally still while you are kicking so that you isolate your quad and hip flexor muscles.