Wednesday, June 26, 2013

Core Workout with the Leg Roll!

This week my family is headed to the Bartlett family get-together where the cousins get to run around and play together, the grandparents are in heaven because they are will the whole clan, and us parents (hopefully) get to relax a little (ahhhh).  During this trip I know there will be lots of physical activities: swimming, hiking, and games of tag (to name a few).  Although these are not the traditional workout, they will definitely be doing just that: working us out!  With all of warm summer days ahead, I encourage all of you to try out a few of these fun activities; just make sure you actually do them hard and fast enough to get your heart rate up a bit!  Getting out in nature to exercise will not only be good for your body, mind, and spirit, it will also be a lot of fun.

That said, if you’re camped out inside or watching movies with the family, try out this core toning exercise; you can lie down, “relax”, and still be working on those great abs!

Leg Roll
NOTE:  You ideally want to use an exercise ball; if you don’t have one, you can modify by putting your legs up on a sofa (but it will be a bit more challenging).

Start by lying on your back, arms extended out from your sides.  Pull your belly in while pressing your arms and palms into the floor to support your lower back; this will also activate more muscle groups, giving you a better whole body workout.  Maintaining this position, bring your feet up to the sides of the ball.  Think of squashing the ball by pulling your legs together to activate your inner thighs.  Take a deep breath in as you twist your legs and hips to the right (rolling the ball with your legs); exhale and return back to your starting position.  Inhale and twist to the left, rolling your right hip up; exhale and return back to your starting position.  The farther you roll the more core and stabilizing muscles you will use.  Remember to use your arms for balance and support.  Go for 3 sets of 10 – 20 repetitions (right side, left side = 1 repetition).
Have a great week!  Remember to keep moving your body (and having fun) whether you’re inside, or outside.

Wednesday, June 19, 2013

Lunge/Knee Combo - Tone Those Legs!

This week we are all about the legs.  I am almost to the 6 week mark after having my daughter and I am itching to do exercises like this (but I have to wait for the a-okay from my doctor) so I will have to live vicariously through all of you.

This move is great for your legs, glutes, and core.  That said, if done incorrectly it can lead to knee or back pain so PLEASE, read the instructions below.  It’s like I tell my students: if you start to hurt where you shouldn’t (back or joint), stop, take a break, make sure you are doing it correctly, and then try again at an easier level; however, if it’s your muscles that are hurting, suck it up and keep on going! ;)

Lunge/Knee Combo

Step your right leg back, keeping your weight on your left leg.  Tuck your hips under, pull your belly in to support your lower back, and open your chest.  Maintain this position throughout the exercise.  Now, pull your thigh muscles in toward the bone and lunge straight down.  Make sure that you do NOT let your knee buckle in or come past the toes on your front foot.  In addition, it is very important to keep most of the weight off your back knee.  To do this, keep as little weight on the back foot as possible (think of it as just being there for stabilization).  From here, focus on pulling in to your core as you explode upwards, bringing your right knee up high while at the same time pulling down with your arms for a “Rising Knee” (if you are martial arts inclined, add a front ball kick here).  Return to the starting position.
You can do this move both fast and slow.  Slow, you will work your stabilizing muscles and your core; fast you will work your heart and develop your fast-twitch muscles.  For slow, go for 3 rounds of 10-20 Lunge/Knee Combos on each side.  For fast, go for 2- 30 sec – 1 minute rounds.

Week 4 - postpartum - Journey Back to Great Shape

Week 4. This was a week of coming to terms with my post-preggo body.  I have decided that saying: “you look beautiful…amazing…etc.” is the most wonderful thing you can say to a woman after she has had a baby, because don’t we all feel a little frumpy right after that joyous day has come?  Our bodies grow, and change so much as our perfect little peanut is developing in our belly.  However, after that perfect peanut is born, we’re still left with the growth and change that our body went through over those 9 months!  And for me, being in the health and fitness world, I had deluded myself that my body would go back to it’s pre-baby shape within about a month or 2.  Yes, I knew I would need to tone and strengthen my muscles again, but I definitely thought I would be back into my slightly larger post-preggo pants by now.  But no…

I was getting a bit discouraged by this, until this week.  I finally realized that with my first child, my hips were still 2 sizes larger 6 months after he was born then they were prior to that pregnancy.  Oh!  Big ‘Ah Ha” moment.  Crazy, since I’ve been through this transition before, but I simply forgot how long it took!  Even now, I just remembered what my midwife said to me that first time around: “it took 9 months for your pregnancy, it will probably take 9 months to get back”.  If it ever does…
Luckily, for me, I know that by 9 months after my son was born I had surpassed my pre-pregnancy shape and was in the best shape of my adult life.  So, to all of you out there, either wanting to get back into shape after a pregnancy or wanting to get back into shape from whatever life event you have been going through, it IS possible to get into excellent fitness and reach your goals; I am living proof.

So for now, I have realized that I need to embrace my “enhanced” pear-shape.  Once I get the a-okay from my doctor to start exercising again I will work on toning my muscles, but my hips will be as they will be (I just plan to make my pregnancy saddlebags go away).
This week my daughter has really been working my arms!  I think she wants to help tone my biceps back up!  Seriously, when all else fails, this is the move that calms her down and relaxes her the most.  Try this move out and I guarantee you’ll feel your muscles working.


Baby Bicep Curl
You can do this seated or standing.  As for the weight, if your baby is under 10 to 12 pounds, you can probably do this the baby way; if your baby is over the 12 pound mark (or you don’t have a wee one), just hold a weights between your hands.

Start by tightening your core to activate your abdominal muscles, open and lift your chest, and relax your shoulders.  Keep this throughout the exercise.  Now, hold your baby (lying down between your arms) or your weight out in front of you and bring your elbows into your sides; this is your starting position.  From here, all you have to do is lift your hands from belly level up to your face level, then back down.  That’s it!  Go for 30 sec – 1 min rounds.  You can for fast or slow…mix it up!  If you are doing this with your baby, see what they like best!

Enjoy!

Wednesday, June 12, 2013

Tone Your Arms with the "Rising Forearms" Move

Oh my goodness, it has gotten hot, hot, hot outside!  Hello Summer!  This week we are focusing on our lovely arm muscles again.  And with the hot weather, who wouldn’t want to show off some toned arms with a sleeveless shirt?

This week’s exercise can easily become a whole body exercise so make sure to try out the variations below.


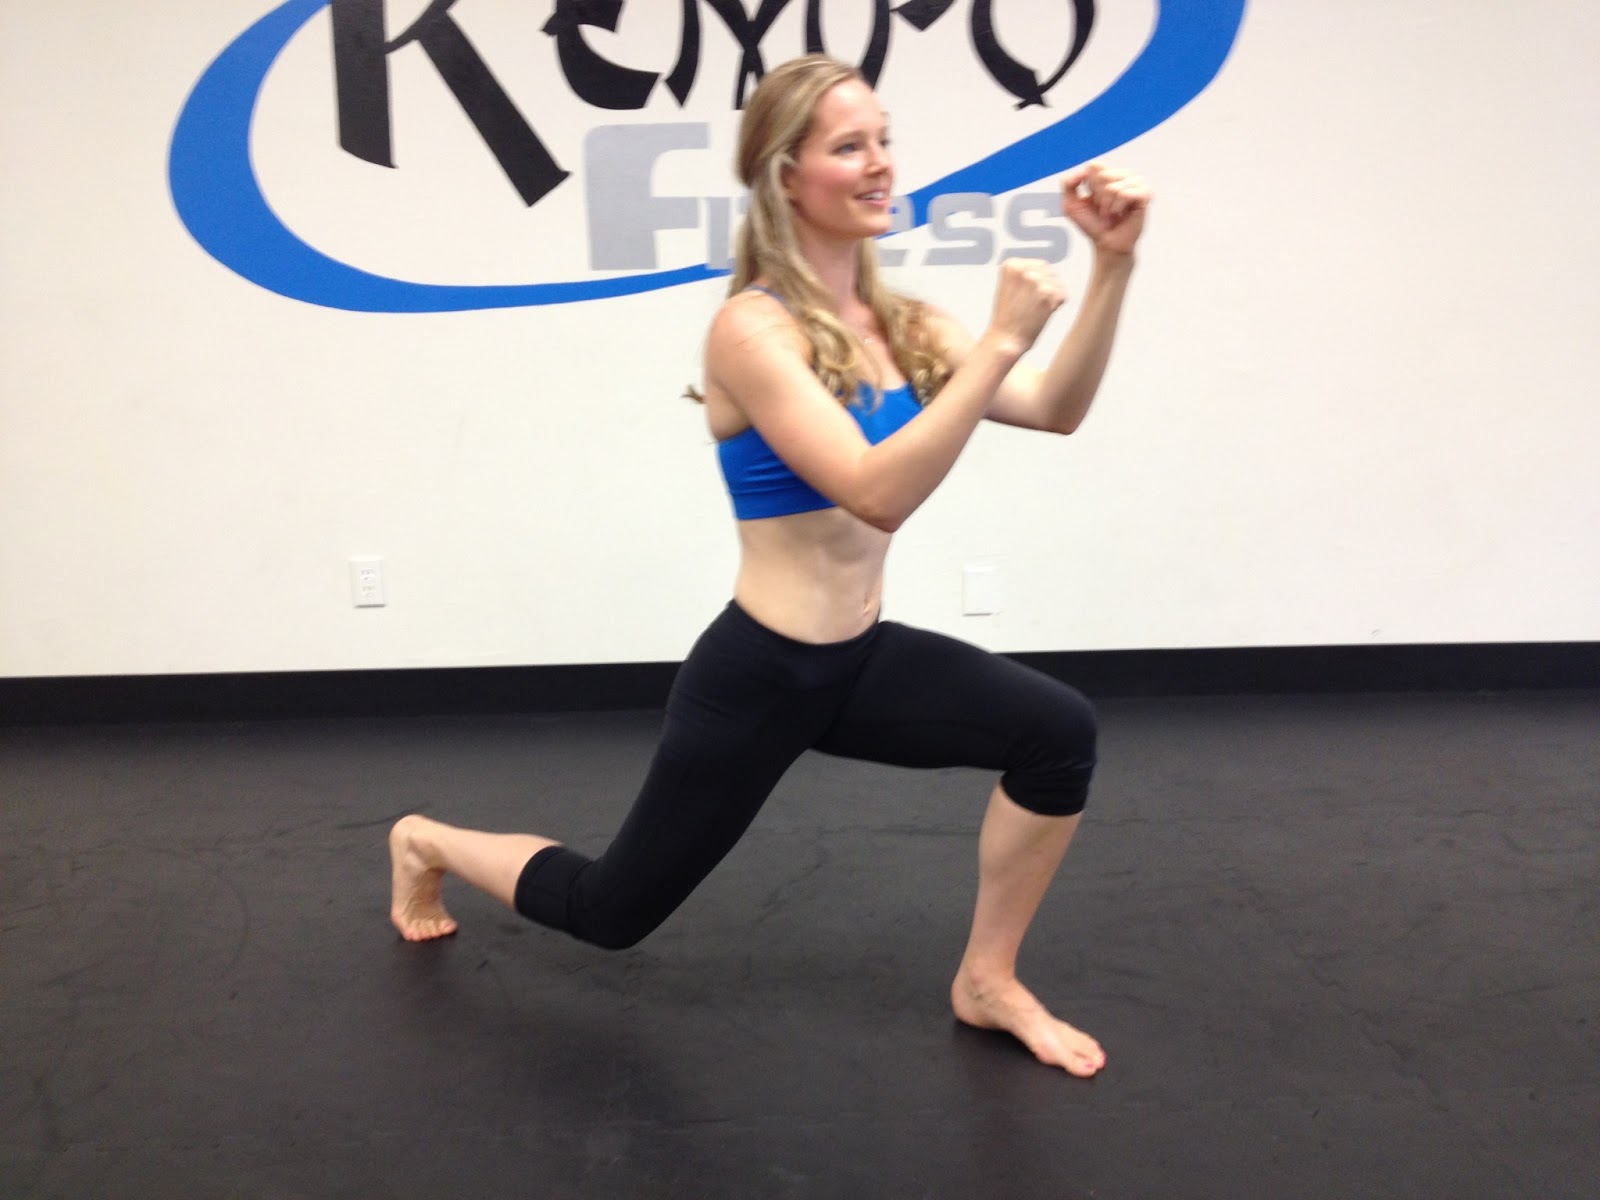
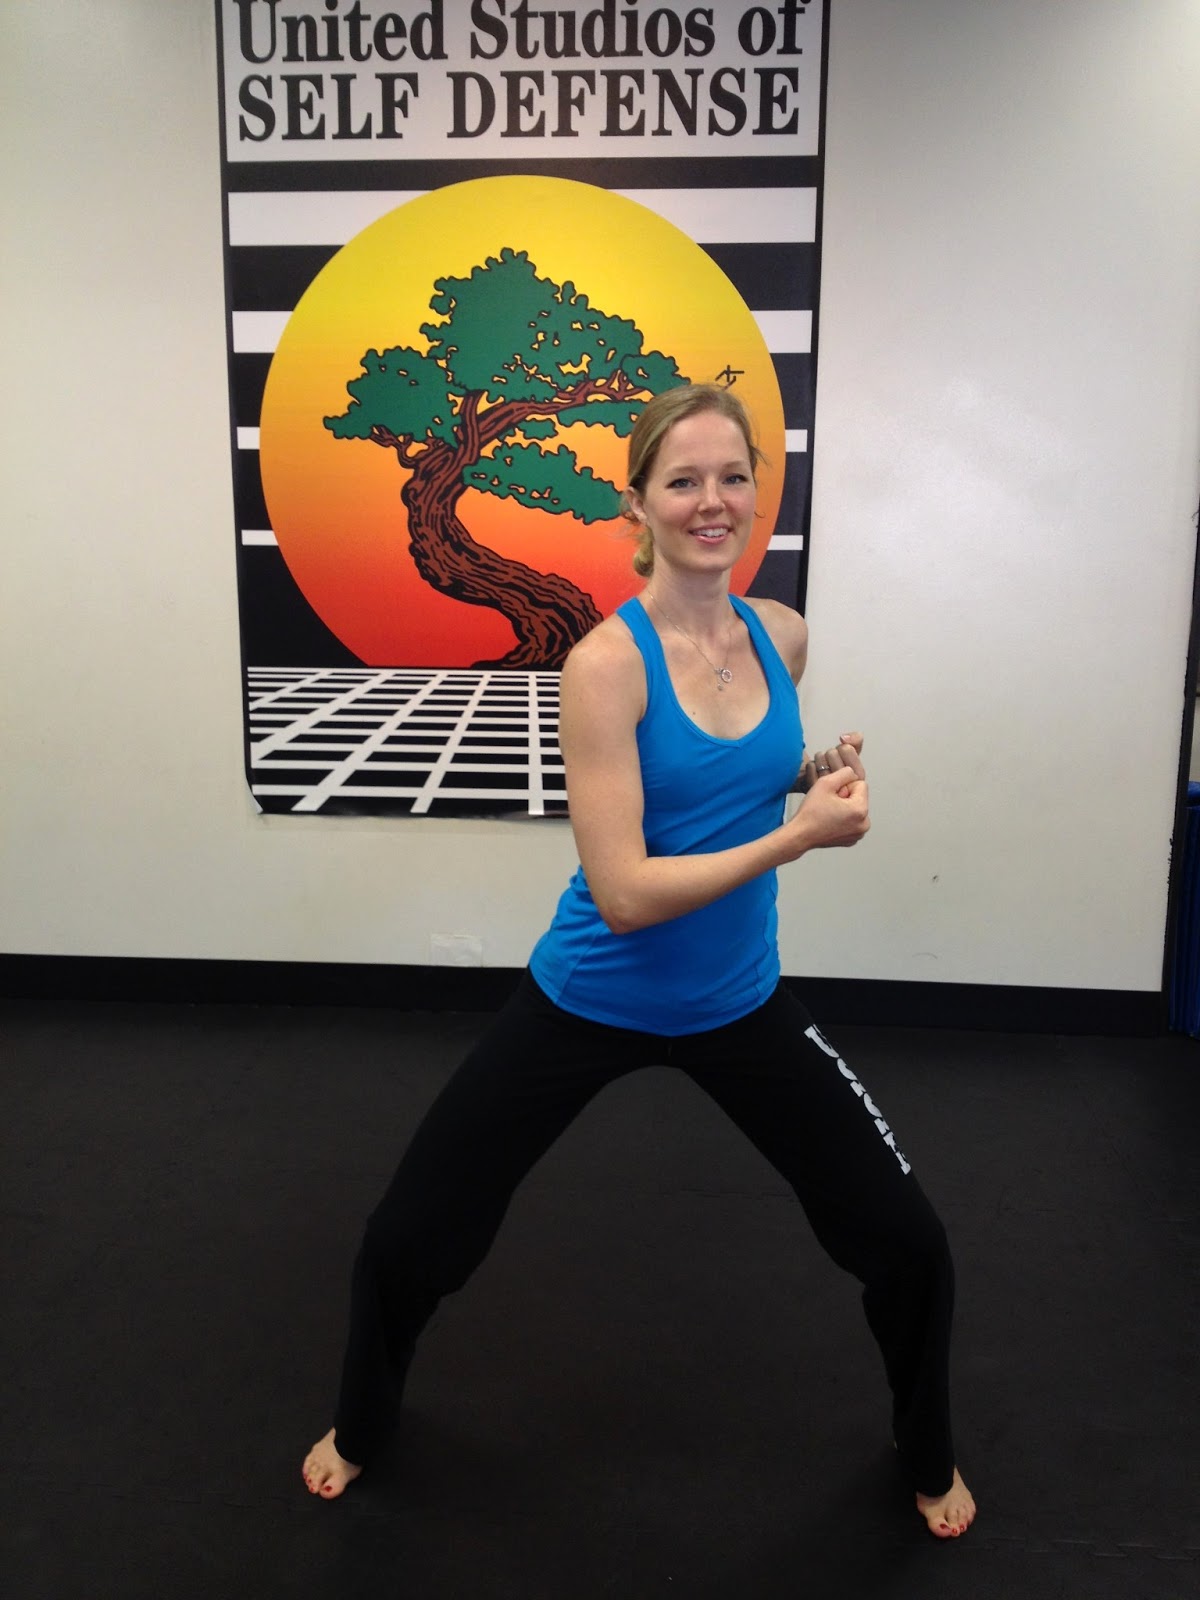
Rising Forearms (an “Overhead Block” in Kempo)
 
Begin with your legs wide (as though you were going to do a squat); keep your knees pressing out to activate your inner thighs and protect your knees.  Pull your belly in to support your lower back, open and lift your chest, and relax your shoulders.  Maintain this position throughout the exercise. 
Pull your hands into your armpits, bringing your elbows behind you; we call this “Elbow Position” in Kempo.  Try to keep your hands coming back to this position as it will work your back and triceps.  Now for the move: keeping your arm bent, bring your right arm in front of you and across your body, then forcefully shoot your arm up above your forehead.  Repeat on the other side.  That’s it!  Go for 2-3 1 minute rounds.  These speed rounds will create long, lean muscles…great for tank tops!

Note: The faster you move and the more power you put into it, the better of a workout you will get.  So make sure you really push yourself and push those arms!

Variation 1: If you want more of a challenge or to build a bit more muscle, add hand weights.  I recommend light weights (between 1-5 pounds) so that you can keep the 1 minute rounds.  Note:  as soon as your shoulders start lifting up toward your ears and you can’t keep them down (your trapezius muscle will be starting to hurt), you need to drop the weights and keep going without them.  Your shoulders are lifting because your arm muscles are getting fatigued.  This means your body has to recruit more muscle groups in order to keep doing the same movement and in this case, you are probably straining something.  If you keep going, yes you will still get a workout, but you will most likely also end up with a sore neck.
Variation 2: Add squats to get your legs more involved.  As your hand starts low, start low in your squat; as your hand shoots up, explode up out of your low stance.  Slow your rhythm down slightly so that you can get a nice deep bend in your squat.  Note: remember to keep your knees over your feet (you should be able to see your toes)!
Variation 3: Exhale loudly from your mouth as your right arm shoots up (inhale with your left).  This will contract your abdominal muscles, giving you a standing core workout.  You will have to forcefully expel your air in order to contract your muscles.  Note: vary the inhale-exhale with your movement (you don’t want to hyperventilate or turn blue!)  For example, if you are doing variation 2, you might inhale on your squat and exhale on the rising up.

 Let me know which variation you like the most.  Have a great week!

Week 3 - postpartum - journey back to excellent fitness

Week 3.  This week I was feeling the need to start moving more; some things turned out good, some things not so good.  For the good, I found that rising leg lifts have been a gentle way to start getting my legs and core warmed up again.  For the not so good: squats.  I know, I know…I just had a baby…what was I thinking?!?!  I was thinking: I don’t like my saddle bags and dimpled legs…I must do something to get them back into shape!  But my body quickly told me I need to wait a few more weeks for those wonderful squat exercises. 

I still am not carrying my 30 pound son around but I think by next week I’ll be picking him up for some big bear hugs again.  In general though, I’m feeling pretty darn good!
If you want to try out the leg lifts, read on:

Leg Lifts
I’ve been starting off with only 1 set of 10 to the front, side, and back, making sure to keep my kicks relatively low and slow.  This will make sure that I work all sides of my legs while not straining my midsection.
Since our insides need to heal after having a baby, you have to make sure not push your core muscles very much.  In addition, since your core muscles have been stretched to the limit and then put thru the ringer, they are probably going to be a bit weaker than normal; this means that if you try to work them too much your body will compensate for their weakened state by recruiting your lower back muscles…this is not what you want.  So, in order to still get a “good” workout, you need to really extend the leg, reaching out thru your toes; this will activate all of your leg muscles.   Flex each muscle and then act as though you are pushing up and down against something, giving your leg more resistance than just air.
Tuck your belly in and lift your chest up and open to support your lower back.  Maintain this position throughout the exercise.  Inhale as you lift your leg up, exhale as you return your leg back to the starting position.  Go for 1 round of 10 reps to the front, side, and back.
Note: Hold onto something for stabilization as needed (we don’t need you toppling over!).

Wednesday, June 5, 2013

V Core Power -- Great for those Abs!

This week’s move comes from yoga and is all about working your core and stabilizing muscles.  If you are going to dare to bare your midriff this swimsuit season, core work definitely needs to be a part of your repertoire.  That said, this move is not a cardiovascular exercise so you will need to add in those moves as well (I recommend the “Rising Knee – Front Ball Kick” and the “World of Knees” (front, side, and roundhouse) to name a few).  And now, without further ado, get ready for the:

V Core Power
Note:  If at any point your back begins to hurt, stop, relax, and stretch out a bit.  Once you feel better, begin at the starting position again, making sure to go through all the steps.

Starting Position
Begin seated on the floor with your knees pulled up to your chest.  For this exercise is it very important that you really focus on using your core and stabilizing muscles to support your lower back; to do this, pull your belly in toward your spine, open and lift your chest, and try to lengthen your spine (pull your spine up through the crown of your head).  Make sure you continually work of maintaining this support throughout the entire exercise!  To bring in the rest of your body, press your knees and feet together to activate your leg muscles.  In addition, extend your arms out in front of your shoulders, lengthening and tightening your arm muscles as much as you can; this will activate all of your arm muscles.  Now for the 3 levels of the “V Core Power”.  Begin with the 1st level.  If you can successfully do this without causing any back pain, move on to the 2nd level.  Again, if you can successfully do this level without causing any back pain, then and only then, should you progress on to level 3.

Level 1 – Full Modification
Keep the starting position described above.  To activate your core, lean back slightly with your upper body; this will make you hold up the weight of your upper body with your core muscles while still giving you support and grounding since your feet are on the floor.  Keep pressing those legs together to pull some of the work into your other muscles groups.  Start with 3-6 rounds of 10 seconds.  If this goes well, begin increasing the duration of your rounds.  Once you can do 2-4 rounds of 30 seconds, move on to Level 2.
Level 2 – Half V

Begin at the Level 1 position.  Now, we’re going to eliminate the extra leg stabilization by picking your feet up off the ground.  Keep your knees bent and pressing together while holding your calves parallel to the ground.  Make sure you keep pulling in with your belly and extending out and up with your chest!!!  Again, start with 3-6 rounds of 10 seconds.  If this goes well, begin increasing the duration of your rounds.  Your goal is to do 2-4 rounds of 30 seconds.  If you can do this without any back pain, try increasing the time; see if you can get up to 1 minute!  Once you can do either of these last two things, you can move on to Level 3.
Level 3 – Full V

Begin in the Level 2 position.  Keeping the knees and thighs pressed together, lift your feet up until your legs are straight.  Now you will really feel your legs working in addition to the rest of your body!  If you are in the proper position, your body will be making a symmetrical V shape.  Please, please, please make sure you keep pulling your belly in and extending out and up with your chest!!!  Like in the other rounds, start with 3-6 rounds of 10 seconds.  If this goes well, begin increasing the duration of your rounds.  Your goal is to do 2-4 rounds of 30 seconds.  If you can do this without any back pain, try increasing the time; see if you can get up to 1 minute! 

 Have fun!